Amiimal
| “ | These reliable folks defend bases. They use their own weapons to attack grocks that are within range. Each weapon has a unique effect, sometimes different even from those of the same type. | ” | — Encyclopedia entry for NPC Amiimal gunners |

An Amiimal is a variant of Miis that only appear in Dillon's Dead-Heat Breakers. Amiimals are depicted as anthropomorphic animals as opposed to having a human-like appearance, though unlike the anthropomorphic animals shown in StreetPass Mii Plaza, they retain the Mii's head. However, the head will gain body parts that correspond to the Amiimal's species (often a snout and ears), while the Mii's original body is replaced with a bipedal animal body.
Amiimals have voices akin to that of the Animal Crossing series, which not only vary by the Mii's gender, but the species as well. Bears, bulls, and tigers have the deepest voices, while ducks, mice, and rabbits have the highest. All other species have a pitch that is in the middle. Child Amiimals share a unique soft spoken voice regardless of gender or species.
In Dillon's Dead-Heat Breakers
Player
The player's Amiimal is based on the Mii the player has selected for their file. They serve as the deuteragonist of the game and team up with Dillon to save several villages from the Grock threat.
Story
When the game begins, the player's Amiimal drives away in their big rip from a group of Grocks in their driving form. Dillon and Russ spot the player's big rig and attempt to stop the pursuing Grocks from destroying it. Upon defeating the Grock army, the player reveals to the two they fled their village, named Farsen Village, in order to escape the invasion and needs to contact it, after which all three head over to the City.
Upon arriving in the City, the player parks their big rig in Russ's garage, where they work with Russ to contact their village. Upon contacting Farsen Village, they receive a message from its mayor, Farmar, but she is cut off shortly after. Russ then hacks into a radiation-monitoring station's camera, where they discover that the village is covered by a giant red dome generated by a Grock mother ship, suspecting that no one can enter or leave.
When Russ ponders how to destroy the dome, the player reveals that their big rig was meant to carry a large weapon that can destroy the source of the dome. Russ then suggests the player to go over to Weldon's Shop to request its owner, Weldon, to craft the first part of the weapon, a Meteorite Base, but Weldon tells them that they need materials dropped from certain types of Grocks in order to craft it. Weldon then receives a call from Rita, the hotel's clerk, who informs that there is a Grock invasion in a nearby village.
Upon entering the hotel's lobby, the gang eavesdrops on a young mouse villager, Niko, begging a group of gunners to save his village, Startsen Village, but they refuse to help him unless he pays them money, even when he promises the mayor will pay them after the battle. Said mayor, Panthado, then enters the lobby and loans a bag of money to the player, allowing the gang to hire gunners for the upcoming battle, though they must pay the debt to Panthado after finishing the battle.
As the player saves more villages (in addition to mines) from Grock invasions, they will also gain access to more materials for Weldon to build more parts for the big rig's weapon. Once all 14 parts are built, the weapon, dubbed the "Breaker", will finally be complete and the gang heads off to Farsen Village. On the way to the village, the gang is ambushed by Grocks, where Dillon must once again protect the big rig. Upon arriving to Farsen Village, the player fires the Breaker at the Grock mother ship and destroys it, thus destroying the red dome in the process. However, the command ship comes out of the mother ship, resurrecting all of the fallen Grocks to attack the village once more.
Once several Grocks are defeated, the Breaker will finish charging up, but the command ship will activate Death Charge, disrupting the Breaker's charge, and all remaining Grocks on the field fuse together to form the Deathgrock. Once the Deathgrock is destroyed, the Breaker regains its energy and the player fires at the fleeing command ship, saving Farsen Village from destruction and being deemed its hero by Farmar. Once the file is selected after completing the game, Farmar will visit the City, where she will further congratulate the player and request to stay in the City for the time being.
Creating an Amiimal
Upon starting a new game, the player is asked to assign a Mii. When a Mii is selected, a barrel is dropped onto them and the player must press the A button 40 times in order to escape. Upon escaping, the Mii is transformed into an Amiimal. If the player declines an Amiimal species, they must repeat the same method again in order to switch to another species, though the amount of button presses is subsequently reduced to 20. Once the player is done creating their Amiimal, the Mii and species cannot be changed.
There are a total of ten species of Amiimal: bear, bull, cat, duck, fox, mouse, rabbit, sheep, tiger, and wolf. The player can only choose from four different species of Amiimal, the specific set and order of which depend on the Mii's head shape, hairstyle, eyes, eye position, nose, nose position, and mouth (e.g. the default male Mii can only choose between wolf, rabbit, duck, and tiger in that order; the default female Mii's set and order instead goes cat, wolf, rabbit, and tiger). Noses and mouths are completely obscured by the Amiimal's snout. Sheep Amiimals always have an afro-esque hairstyle, obscuring the hairstyle the Mii originally had.
While the size of the Mii's nose does not affect the Amiimal set and order, it can, along with the position, alter the size and/or position of the Amiimal's snout.
Each Amiimal species has a set body and hair color (e.g. rabbit Amiimals will always have yellow fur and blonde hair), but the hue of both can be changed via the Mii's skin tone and hair color respectively. Neither of these affect the Amiimal set and order.
The following Mii options do not affect the Amiimal set and order, but are retained in the Amiimal:
- Facial markings (some facial markings may be obscured with certain species)
- Reversing a hairstyle
- Eyebrows
- Eye color and size
- Glasses
- Mole (only visible in bull, cat, sheep, and tiger)
- Beards (some beards may be obscured with certain species)
- Favorite color (only affects certain hairstyles)
The following Mii options do not affect the Amiimal set and order, and are not retained in or have no aesthetical affect on the Amiimal:
- Mouth color, position, and size
- Moustaches
- Height
- Width
- Gender
Gameplay
In the hub world, known as "the City", the player controls their Amiimal, where they can do various activities such as shopping for items and gear for stages, selling items and treasures for money, and playing minigames to earn money or other prizes.
During stages, the player's Amiimal instead acts as a CPU ally to Dillon, where they can fight Grocks using their weapon. Upon arriving at Goodonya Ranch, the player gains a jetpack, which unlocks the "Player" button on the bottom screen. When the button is tapped outside of a battle, the player can travel to a specific location by tapping a designated target icon on the map. If the "Player" button is tapped (or down on the D-pad is pressed) while Dillon is battling Grocks, the player will join him in battle. While the player is traveling to their assigned destination or battling a Grock, the "Player" button cannot be selected.
The player begins with a total of five hit points. During stages, Dillon can heal the player during or outside of battles to recover damage, though they cannot be healed with the Auto Medkit item. If the player loses all their health, they will remain unavailable for the rest of the stage. In the City's hotel lobby, the player can pay 100 money to Garrison for a special drink, which will give them one extra hit point temporarily. The player cannot order any more drinks from Garrison until the extra hit point is lost. As the player progresses through the game, they can receive an additional hit point permanently by drinking Health Drinks at the General Store, with the maximum a player can receive being 10. Each Health Drink scales in price, with the first one costing 1,000 money and the final one costing 3,500 money. The player can only have one Health Drink per day.
Gunners
Aside from the player's Amiimal, there are also NPC Amiimals the player can recruit called "gunners". These Amiimals are based on Miis the player has saved on their system's Mii Maker and are always the species that appear first when assigning their Amiimal.
When preparing for a stage, the player can hire gunners in the City's hotel lobby to help them for the stage, though they can terminate a gunner's contract by talking to them again after hiring them. The player can also speak to Russ to recommend which gunners to hire, with the recommended ones having a thumbs up icon next to their icon. Additionally, the player can pay Stranger to automatically gain info on all the hirable gunners without needing to talk to them first. How many gunners the player can hire varies between stages, with the maximum number a stage can have being 10. At least one gunner is required to enter the Startsen Village stage, while at least three are required to enter the Farsen Village stage. Upon entering the stage, the player can assign gunners to bases or gun towers, where they can be assigned either manually or randomly. When preparing for mine stages, gunners cannot be assigned to a mining center.
Each gunner comes with their own weapon, which vary in power, range, and energy consumption. When a Grock enters their range, they will attack them, but this will also drain their weapon's energy, with higher energy consumption draining a gunner's weapon quicker. To charge a gunner's weapon, Dillon must hop on a Charging Roller and perform Roll Attacks until the weapon is fully charged. At the end of a stage, each gunner receives experience points, with bonus points being given to the ones who defeated the most Grocks. Additionally, one gunner can be selected to return to the hotel lobby the next time the player prepares for a stage. If a gunner's base or gun tower is destroyed, the gunner will be permanently unavailable to hire for future stages.
If the player enters a stage without hiring enough gunners, they are given the option to hire villagers for free, though no such option is available for mine stages. Villager gunners are always referred to as "Villager" followed by a letter in alphabetical order. Villager gunners are always level 1 and if their bases are destroyed, the player will lose points at the end of the stage.
NPCs
Aside from the player and gunners, there are also Amiimals that only serve as NPCs. While some NPCs are only seen in cutscenes, others can be found and talked to by the player. These NPCs can be found outdoors within the City, as well as the hotel lobby, hotel's gym, Scrog Farm, and Stadium Gate. Some City NPCs also have the same designs as gunners, though they cannot be hired. NPCs in the City have preset designs and names. Outside of stages, villagers are most often seen in cutscenes where the heroes meet the authority figure of the stage, though a random villager will visit the City during the evening. Like all NPC Amiimals, villagers have preset designs. Niko is given his own entry in the Encyclopedia, making him the only Amiimal character with this distinction.
Gear
List of guns (player)
There are three types of guns the player's Amiimal can equip, each having five variants that scale in power, with the level 5 variants being the strongest. The player starts out with the Lion gun, but can also purchase the Gator or the Shark guns from Sal upon preparing for the first mission. Stronger versions of these guns become available to purchase from Sal as the player progresses through the game.
| Name | Image | Price | Description |
|---|---|---|---|
| Lion | 250 | This Russ-designed rifle makes its own energy, allowing for unlimited rapid fire. That said, it's still just a prototype so it lacks firepower. | |
| Lion 2 | 800 | The energy production and firepower have both been improved. The blasts launched from this rifle resemble a pride of lions on the hunt. | |
| Lion 3 | 1,200 | Sal got his hands on Russ's design data and passed it on to an expert to upgrade this rifle. Using lava as a core, it's now stronger than ever. You'll break a sweat just holding it. | |
| Lion 4 | 1,600 | The lava in this ultimate rifle is so hot it requires a built-in cooling system. Sal used his back channels to make it. He'd be done for if the design data ever leaked. | |
| Lion 5 | 2,200 | This rifle is at max power. Pull the trigger and allow the king of beasts its hunt. All Lv.5 weapons are equally as powerful regardless of type. | |
| Gator | 250 | This rifle, designed by Russ, is so named for its heavy green body. There's quite a bit of room for improvement, particularly where firepower is concerned. | |
| Gator 2 | 800 | The internal circuitry has been simplified to boost this gun's performance. It's on par with other gun types of the same level, but its ring-shaped lasers are popular. | |
| Gator 3 | 1,200 | A certain someone brought Sal's idea to life when they created this weapon. Electricity runs through an emerald dipped in a special solution to produce its energy. | |
| Gator 4 | 1,600 | Once the underground got its hands on schematics for Gator 3, an upgrade was inevitable. The modder boosted its power but kept the classic laser rings out of respect for Russ. | |
| Gator 5 | 2,200 | An immense amount of energy is produced by multiplying the emerald's powerful shine. This will seal an enemy's fate as handily as an alligator choosing its prey. | |
| Shark | 250 | Named for its unique shark-tooth design, this popular gun discharges blue fireballs. | |
| Shark 2 | 800 | Specially processed ore makes for a more efficient energy source. Its fireballs are more powerful, but the weapon itself is still not fully understood. | |
| Shark 3 | 1,200 | Charged energy is released in a blazing blue flame with all the fury of a shark attack. Although comparable to other weapons of its level, this one is by far the most awesome. | |
| Shark 4 | 1,600 | It's said this gun was blessed by the sea so no amount of water can extinguish its flame. Apparently Sal asked his connection in a cult for the "evil upgrade" for this one. | |
| Shark 5 | 2,200 | This gun's controllers have been upgraded with additional output devices. The extra energy is converted into a blue waveform that annihilates all foes. |
List of guns (gunners)
There are four types of guns an NPC gunner can be assigned to. Every 3 levels a gunner gains, their gun will also increase in level. While the overall range for a specific gun is consistent, the attack power and energy consumption varies between Miis. Unlike the player, a gunner cannot change their gun.
| Name | Image | Description | Range |
|---|---|---|---|
| Impact Blaster | Short range and easy to handle. (LV 1 variant) Powered up short-range weapon. (LV 2 variant) Upgraded defensive weapon. (LV 3 variant) |
10↑ 300m | |
| Vulcan Cannon | Low power but high firing speed. (LV 1 variant) Rapid firing for midrange shooting. (LV 2 variant) Upgraded Vulcan with improved rapid-fire. (LV 3 variant) |
10↑ 950m | |
| Plasma Cannon | Solid range and power. (LV 1 variant) Expensive but versatile cannon gun. (LV 2 variant) Upgraded Plasma Cannon with more power. (LV 3 variant) |
1100↑ 1800m | |
| Long Buster | Excels at long-range shooting. (LV 1 variant) Powered up despite its shortcomings. (LV 2 variant) Devastating blasts from extreme distances. (LV 3 variant) |
3000↑ 3600m |
List of jackets
There are five different jackets the player's Amiimal can wear. The player starts out with a Worn-out Jacket, but more jackets become available to purchase from Sal as the player progresses through the game. Once the player purchases a jacket from Sal, the Worn-out Jacket will be permanently replaced and cannot be reobtained by any means.
| Name | Image | Price | Description |
|---|---|---|---|
| Worn-out Jacket | N/A (obtained by default) | Recovered by <player Mii> in some rubble outside a village a few years back. It was ridiculed for being secondhand, but don't call it outdated... It's vintage. | |
| 7-ball Jacket | 900 | These jackets were worn by a shadowy militia group. The number is thought to be lucky. Some who wore it came from nothing, but rose through the ranks to great success. | |
| Wing Jacket | 1,200 | Such jackets were worn by a shadowy militia. It's said wearing it will make you feel like you have wings. (Effect may vary per wearer.) | |
| Rogue Jacket | 1,500 | The militia was at one time a force for good, but one day went berserk without warning. That, along with the members' haircuts, earned the militia the nickname Crewcut Timebomb. | |
| Lightning Jacket | 2,000 | Such a jacket was worn by the leader of the shadowy militia. It's said the jacket intensified her already blazing spirit and explosive power. |
Gallery
- See also: Amiimal/gallery
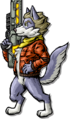
Official artwork of a wolf Amiimal
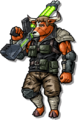
Official artwork of a bull Amiimal
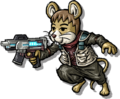
Official artwork of a mouse Amiimal
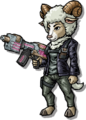
Official artwork of a sheep Amiimal

Group artwork of several Amiimal species


Trivia
- The Amiimals shown in promotional artwork are based on several CPU Miis from Wii Sports Club and Wii Party U:
- The wolf Amiimal with blonde hair is based on Matt (not to be confused with Matt from the original Wii Sports).
- The bull Amiimal is based on Rui.
- The mouse Amiimal is based on Cheng-Han.
- The sheep Amiimal is based on Se-young.
- The artwork of a Mii transforming into a wolf Amiimal features Guillermo. Despite this, he cannot become a wolf in-game; his default species is a tiger, while his only other options are a fox, mouse, and cat.[1]
- Early models of every Amiimal species (except for the tiger) can be found in the game's files. Instead of each species having their own unique anatomy, every species of a particular size group share a near identical humanlike body, with only a few differences between them (e.g. the bear and bull share a physique, but have different tails). These models are also shown carrying holsters, which none of the Amiimal species in the final game possess. Additionally, they wear an early version of the Worn-out Jacket that comes in several different colors, whereas the one in the final game only comes in orange.[2]
- In addition to the early models, model parts for two unused Amiimal species can be found: deer and puma. The deer has the body model used for large Amiimal species, while the puma's is that of a medium-sized one.
- While there exist early models for gunners and villagers, they wear the same jacket and bandana as the player. In the final game, villagers do not wear bandanas while gunners wear completely different outfits.
- Two early bull models, named "kmCow" and "kmCowBodyLoGun", wear a dark gray undershirt, whereas all other early models do not wear anything under their jackets. Additionally, their anatomy is closer to the final game compared to the other early bull models.
- In the files of the game, there exists an earlier version of a fox Amiimal. While its appearance is closer to the final game than the other early models, the model lacks the cheek fur the fox Amiimal in the final game possesses and the mouth is clearly visible, whereas all Amiimal species in the final game have the Mii's mouth hidden under their snout.[3]
Names in other languages
| Language | Name | Meaning |
|---|---|---|
| Japanese | ケモだち Kemodachi |
Portmanteau of 獣 kemono (beast) and 友達 tomodachi (friend) |